How To Carve a Turkey
How To Carve a Turkey

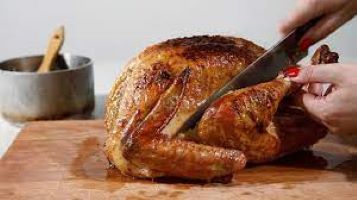
You’ve just finished roasting a gorgeous golden-brown turkey. Best wishes! It needs to be carved now.
Let us simply say, disregard everything you’ve heard—all you need is a solid workstation and a sharp knife to learn how to carve a turkey, even if you’re a newbie.
It’s much easier if you carve one side of the turkey at a time rather than shifting it around all the time.
It cannot be flipped or turned from side to side.
Turn the turkey only once after placing it on the chopping board with its cavity facing you.
This post will teach you how to carve a turkey with pictures.
Carving turkey: Meaning
Carving a turkey is slicing a cooked bird into thin pieces with a long, pointed knife.
What tools do you need to carve a turkey?
Use a big, clean cutting board with grooves on both sides; this will allow you to place the turkey on the board as it cooks and keep any fluids from the pan underneath.
To ensure the cutting board stays steady while you slice the turkey, place a little moist cloth below.
A carving knife: A carving knife can be used to carve a turkey in addition to or instead of a chef’s knife.
To make the process even simpler, there are electric and manual carving knives available.
A lot of the effort required to slice may be eliminated by using an electric carving knife, which works by quickly vibrating the blade in various directions.
Sharp chef’s knife: A chef’s knife is useful for slicing and carving various turkey slices.
If it’s been a while since you sharpened your knife, you might want to check if a culinary store provides this service.
Cutting up a turkey into mush is quicker and simpler with a sharp knife!
Serving plate: You need to have a reliable serving plate, ideally one that can be used in the oven or on high heat.
Not only does an oven-proof serving plate offer a safe location to set the carved turkey, but it can also be placed in the oven on low heat and kept warm.
Other things needed include:
- Long, flexible knife (or boning knife)
- Tongs
- Paper towels
- Platter

Before you carve
After removing the turkey from the oven, cover it with foil and let it rest for 20 to 30 minutes, or until it reaches room temperature, depending on its size.
This results in tender pieces of flesh by allowing the fluids to re-distribute throughout the bird and allowing the proteins to unwind.
Once the turkey has cooled, transfer the pan juices to a small saucepan or a glass measuring cup.
Give the fluids a good 10 minutes to settle so the fat can be readily removed by floating it to the surface.
To deglaze the roasting pan, add some water or chicken stock and either put it back in the oven or heat it until it simmers.
Incorporate the liquid from scraping the pan’s browned parts into the gravy recipe, along with the conserved liquids.
Outlined below are steps to carving a turkey:
This is how to carve a turkey at the table; a table with guests and family:
Step 1: Allow the turkey to ‘rest’
Before commencing the carving process, allow the turkey to sit for a duration of 15 to 30 minutes, contingent upon its dimensions.
By settling the liquids, you may cut the bird without worrying about them spilling everywhere.
Rather, the meat will reabsorb the fluid, making it juicier.
Another benefit of letting your turkey rest is that it will chill down a bit, making it easier to work with.
Next, make use of a sharp knife
Take off any butcher’s twine that is still binding the turkey’s legs together before placing the bird on the chopping board with its cavity facing your direction.
Thirdly, take the leg and thigh out.
Make a slit along the skin of the thigh to detach the leg. Perpendicular to the bone, make cuts into the joint and down the body.
Holding the thigh and bending it backward until you hear a snap and can see the joint is a good way to utilize your hands after you’ve hit the bone with the knife.
Wipe your hands (having paper towels handy is a good idea!) and pick up the knife once more.
For deboning, cut across the joint and the remaining thigh flesh to expose the bone. Continue with the other thigh and leg.
Step 4: Remove the wings
Then, remove the wings in the same manner as the legs—pull it backward till you hear a snap. Cut the wings off by slicing through the joints.
Step 5: Take out the breasts
You’ll see how to carve a turkey breast below:
Carve a lengthy incision parallel to the breastbone.
Utilizing lengthy knife strokes carefully peel the flesh away from the bone as you follow its curvature.
Continue down the breast’s other side.
It typically helps to stop here and give your cutting board a quick clean to get rid of any excess fluid.
Take the turkey skeleton off the cutting board.
You may immediately transfer it into a large saucepan if you want to utilize it to make turkey broth.
Alternatively, you may chill it completely before storing it in the fridge or freezer, making sure to wrap it snugly in plastic.
Step 6: Cut up the white meat
On a cutting board, lay the breasts skin side up. With the flesh side down, cut the breasts into slices that are 1/2 inch thick.
These slices will be served. Try using extended cutting strokes rather than quick sawing strokes for the cleanest slices.
Slice each wing in half. Place the white meat onto a serving dish.
Step 7: Cut up the dark meat
Use your knife to wiggle in the joint between the thigh and the drumstick until you find the sweet spot.
The dish should be adorned with the drumsticks. After the thigh has been boned out, position the skin-side-up thigh to be sliced. Move to a plate.
Step 8: Enjoy warm!
The turkey is ready to serve as soon as it is carved and sliced since carving causes the meat to cool dramatically.
Consider adding some seasonal fruit to the dish as a garnish, such as a few bunches of grapes or little pears.
Make careful to quickly whisk the turkey to the table after plating so it doesn’t overcook.
Your guests can dig in while the meat is still warm.
Keep in mind: The remaining food can be kept refrigerated for up to four days when covered.
Recipe tips and variations
Prepare ahead: The turkey should first be roasted, carved, and frozen with its fluids. Next, create the gravy, reheat, and thaw.
Slow cooker turkey breast: This recipe uses no oven space and produces a wonderful, delicate chicken.
Table-side carving: Make a base cut by carving a deep horizontal incision into the breast, all the way to the bone, just above the joints of the thigh and shoulder.
Slice thinly vertically, ending at the base cut, starting close to the breastbone, and working your way lower.
Because you can be cooking a slightly smaller or larger turkey, roasting periods can vary.
Roasting an unstuffed turkey at 325 degrees takes around 15 minutes per pound.
Nonetheless, an excellent meat thermometer—165 degrees in the thickest portion of the thigh—is the best tool for determining if a turkey has been properly roasted.
Roasted turkey breast: This is my go-to dish for a Sunday meal or a mini Thanksgiving menu.
The skin is deliciously crunchy from dry brine and basting, and the flesh is juicy and tasty.
Make a soup or broth with turkey. Use the leftover turkey carcass to make the finest leftover turkey noodle soup you’ve ever eaten or a pot of delectable homemade turkey broth.
How to carve a turkey for beginners~ how to carve a turkey with a knife
- Prepare a place to carve
- Take the thigh and leg off at the same time.
- Take out the turkey breast.
- Take the wing off.
- After flipping the turkey, proceed with steps 2–4 again.
- Place the turkey carcass aside and give the cutting surface a quick clean.
- Take the thighs and drumsticks apart.
- Cut the thighs into pieces.
What are some delicious side dishes to combine with turkey?
Naturally, gravy and cranberry sauce!
Plus, these recipes that readers love:
- Honey-glazed carrots
- Roasted brussels sprouts
- Shaved brussels sprouts salad with cranberries and apples
- Healthy green bean casserole
- A healthy sweet potato casserole
- Mashed potatoes, mashed sweet potatoes, mashed cauliflower, and mashed butternut squash (take your pick!)
Conclusion
No matter what method you use to cook the turkey—the oven, grill, or smoker—the final product will only be as good as your carving abilities!
It might be frightening to carve a turkey, but I’ve got you prepared with the easy instructions you need to know!
FAQs
Can you carve a turkey with a knife?
Before carving, let your roasted turkey sit, covered with foil, for half an hour after taking it out of the oven.
Juices ought to flow freely. It’s time to whip up the gravy!
Tools: Use your hand or a two-pronged fork together with a sturdy, sharp carving knife.
How soon should you carve a turkey?
Before beginning to carve, let your cooked turkey rest for around twenty minutes.
With an equal stroke, slice straight down from halfway up the breast.
What are the steps to making a turkey?
- The first step is to preheat the oven.
- Step 2: If desired, stuff the turkey.
- Step 3: Use foil to tend the seasoned chicken.
- The fourth step is to roast the turkey for two hours.
- Step 5: Take off the foil and give the chicken a basting.
- Step six: When you cut between the leg and the thigh, the fluids should stream clean.
- Step six: Cook until the juices run clear when you cut between the leg and the thigh.
Where do you start cutting a turkey?
Starting with one leg, carefully pull it back to separate it from the rest of the turkey while using your knife to cut through the skin and meat toward the leg joint.
Listen for the joint to “pop” as you slowly pull it; this indicates that the thigh bone has broken through
How do you cut a turkey at home?
Cut out and remove the turkey breasts.
- Take out the thighs and drumsticks.
- Spread one leg out on the board, skin side up.
- Cut pieces off of the crown.
- The turkey breast can be carved in two different ways.
- Take off the legs: After roasting, turn the turkey breast side up and loosen the string that has been tied to its legs.
- Set it on a board.
What type of knife is best for carving turkey?
The sizes of carving knives vary from 8 to 12 inches. We suggest a turkey that is nine inches or longer if it is huge.
The carver must fit comfortably in your hand, just like any other knife.
The handle must provide you with control over the long, thin blade to prevent it from wobbling
Do you carve a turkey the same as a chicken?
Carving a turkey is similar to carving a chicken or other fowl.
Being the largest bird in the group, it may seem frightening, but with a little knowledge, you’ll be handling it like an expert in no time.
To prevent the turkey’s fluids from getting on the chopping board, give it at least 30 minutes to rest before cutting anything.
How long does carved turkey last?
The USDA suggests refrigerating cooked turkey (40°F or below) for a maximum of 3 to 4 days.
Bacterial growth is slowed but not stopped by refrigeration. You may freeze turkey for three to four months.
Frozen leftovers may be kept indefinitely, but if they are kept in the freezer for extended periods, they may lose moisture and flavor
Can a turkey sit for 2 hours before carving?
In the danger zone, which is between 40 and 140 degrees Fahrenheit, a turkey can be left outside for no more than two hours.
Turkey should only be left outside for an hour at a time if the room temperature is higher than ninety degrees.
What are ten tips to use when preparing a turkey?
How to prepare a turkey:
- Select the appropriate bird.
- Purchase the appropriate amount;
- Add vegetables;
- Add enough brine
- You don’t need to bash!
- Cook your stuffing out of the bird,
- Truss your turkey, and clean it beforehand!
Is it okay to cut the turkey before cooking it?
If you’ve never considered chopping a turkey into sections while it’s still raw, there are a few advantages to doing so.
The turkey will cook more quickly and evenly than cooking it whole.
Can I carve the turkey before cooking?
If you’ve never considered chopping a turkey into sections while it’s still raw, there are a few advantages to doing so.
The turkey will cook more quickly and evenly than cooking it whole.
Can I carve a turkey the next day?
It’s simple: Just cook the bird a day or two ahead of time, allow it to cool fully, and then cut it into large pieces, such as drumsticks, thighs, wings, and breasts.
On what should you cut turkey?
Turkey carving: A step-by-step guide
- Cut off the thighs and legs first. Cut through the skin between the breast and the leg to do this.
- Take out the breasts.
- Take off the wings.
- Disentangle the drumstick from the leg.
- Take off the thigh bone
- Cut the meat into pieces.


